



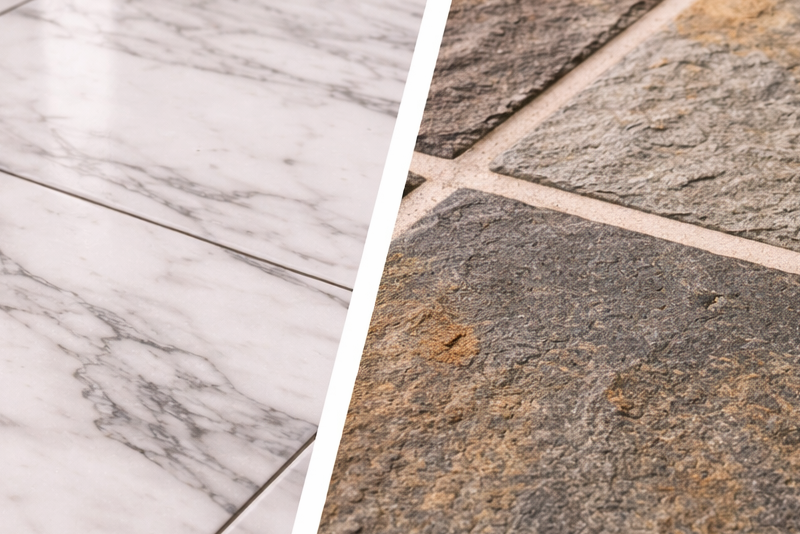
Choosing grout for stone floors in Kenya is not simply a matter of selecting a colour that matches the tiles. Grout forms part of the finished floor system, and the wrong product, joint width, colour or installation method can affect the appearance and performance of natural stone.
This becomes particularly important when the floor is made from marble.
Recommended Stone Solutions



Marble is valued for its veining, depth and natural character. A poorly selected grout can distract from those characteristics, stain vulnerable surfaces, create an unattractive contrast or make joints appear much more prominent than intended.
The problem can also extend beyond appearance.
Incorrect grout selection can make cleaning more difficult, contribute to staining and complicate maintenance. Excess grout residue left on a porous or textured stone surface can also become difficult to remove once it has cured.
For architects, contractors, developers and homeowners, grout should therefore be considered during the stone specification stage rather than treated as a minor finishing material chosen at the end of installation.
Maruti Mining Limited works with natural and engineered stone solutions for architectural projects, and you can visit our Knowledge Base for expert stone insights when planning a natural stone installation.
Why Grout Matters on Natural Stone Floors
Grout is both a functional joint material and a visible part of the finished floor. Its colour, texture, width and compatibility with the stone can influence the appearance, cleanliness and long-term performance of the installation.
When stone pieces are installed side by side, joints accommodate dimensional variation and provide space for the appropriate jointing material.
The grout then becomes part of the visual composition.
A narrow, closely matched joint may allow a marble floor to appear almost continuous.
A contrasting grout can create a deliberate grid pattern.
Neither approach is automatically correct.
The decision depends on the stone, tile dimensions, installation system and architectural intent.
The technical compatibility of the grout also matters.
Natural stone can differ significantly in porosity, surface texture, absorption and sensitivity to staining.
A grout that works well with a dense porcelain tile should not automatically be assumed to be suitable for every marble or limestone.
Why Marble Requires Extra Care
Marble is not simply a decorative version of ceramic tile. Its mineral composition, porosity, finish and natural variation mean that installation materials should be selected with the characteristics of the stone in mind.
Some marble varieties are relatively dense.
Others are more absorbent.
Some have a polished surface.
Others are honed, brushed or otherwise textured.
The stone may also contain natural fissures or areas with different absorption characteristics.
This means grout can interact with the stone in different ways.
A pigmented grout may leave residue on a more absorbent surface.
A poorly cleaned installation can leave a haze.
An unsuitable grout may also create visual inconsistencies.
Before installation, the installer should understand the specific stone being used rather than relying only on general assumptions about marble.
The Seven Main Grout Decisions for Stone Floors
A successful natural stone installation requires decisions about grout type, colour, joint width, compatibility, application method, cleaning and maintenance. Treating these as one coordinated specification reduces the risk of avoidable problems.
The key decisions are:
- Which grout type is appropriate?
- What colour should be used?
- How wide should the joints be?
- Is the grout compatible with the stone?
- Does the stone require protection before grouting?
- How will excess grout be removed?
- How will the finished joints be maintained?
These decisions should be made before the stone is installed.
Waiting until the installer is already working can result in rushed choices.
For high-value marble floors, a sample installation is often useful.
It allows the project team to assess the actual relationship between stone, grout and finish under the intended lighting conditions.
Choosing the Right Grout Type
The correct grout depends on the stone, joint dimensions, environment and installation requirements. Cementitious, polymer-modified and resin-based systems can have different performance characteristics and should not be treated as interchangeable.
The appropriate grout should be selected according to the manufacturer’s technical guidance and the stone supplier’s recommendations.
Factors can include:
- Joint width
- Indoor or outdoor use
- Moisture exposure
- Chemical exposure
- Cleaning requirements
- Stone porosity
- Desired appearance
- Traffic levels
A bathroom floor may have different requirements from a dry living-room floor.
A commercial lobby may experience much heavier traffic than a residential bedroom.
External areas introduce additional environmental considerations.
The grout specification should therefore follow the application.
Why Ordinary Grout Can Be Problematic on Marble
A grout product that performs adequately on ordinary ceramic or porcelain tiles may not be the best choice for every natural stone. Marble can require greater attention to staining, residue and compatibility.
One of the main concerns is absorption.
If a stone surface absorbs pigment or grout residue, cleaning may become difficult.
This is particularly relevant with light-coloured marble.
The issue is not necessarily that cement-based grout is universally unsuitable.
Rather, the installer must determine whether the selected grout is compatible with the particular stone and application.
The manufacturer’s technical data should be reviewed.
A test area can also be valuable before full installation.
This provides an opportunity to identify potential staining or residue problems before hundreds of square metres are grouted.
Grout Colour Can Change the Appearance of a Marble Floor
Grout colour influences how individual marble pieces are visually separated. A closely matched shade can minimise the appearance of joints, while a contrasting colour can make the floor pattern more pronounced.
Consider a light marble floor.
A very dark grout can create a strong grid.
This may be appropriate for a deliberate geometric design.
However, if the intended appearance is a continuous marble surface, the contrast may distract from the natural veining.
A pale or neutral grout may create a softer transition.
The same principle applies to darker marble.
A matching dark grout can reduce visual interruption.
A lighter grout can emphasise individual pieces.
There is no universal “best” grout colour.
The correct choice depends on the desired architectural result.
Should Grout Match Marble?
Matching grout to the dominant tone of the marble is often an effective way to create visual continuity, but the best colour should be selected from the actual stone rather than from a generic colour chart alone.
Marble can contain several colours.
A single slab may include:
- White
- Grey
- Beige
- Cream
- Brown
- Gold
- Green
- Dark veining
The grout can be matched to the background tone or intentionally contrasted with the dominant veins.
For a calm, continuous appearance, the background colour is usually more important than trying to match every vein.
A grout sample placed beside the actual stone is more reliable than choosing from a printed colour chart.
Lighting can also alter perception.
A grout that appears warm under showroom lighting may appear different under natural daylight or artificial interior lighting.
Why Dark Grout Can Be a Risk on Light Marble
Dark grout can produce a dramatic contrast, but it can also become the dominant visual element on a light marble floor and make the natural pattern appear fragmented.
This is not always a technical failure.
It may simply be a design choice that does not achieve the intended appearance.
However, strongly pigmented grout can also create practical concerns if the stone is highly absorbent.
Before using a dark grout with light marble, a test should be considered.
The sample should demonstrate:
- Initial colour
- Ease of cleaning
- Residue after curing
- Staining behaviour
- Final appearance
If the sample performs poorly, the specification should be revised before full installation.
Why Joint Width Matters
Joint width affects both appearance and installation performance. A very narrow joint can create a refined visual effect, but it should only be specified where the stone dimensions, substrate and grout system allow it.
Natural stone pieces can vary slightly in dimension.
The substrate may also have tolerances.
If the joint is made too narrow to compensate for dimensional variation, the installation can become difficult to align.
The joint width should therefore be determined based on the actual stone product and the manufacturer’s recommendations.
It should not simply be chosen because a narrow joint looks attractive in photographs.
For calibrated stone tiles, tighter joints may be possible.
For products with greater dimensional variation, a wider joint may be necessary.
Narrow Joints Versus Wide Joints
Narrow joints create a more continuous stone appearance, while wider joints provide greater visual separation and can accommodate certain dimensional and installation requirements.
A narrow joint may work particularly well for:
- Large-format marble
- Contemporary interiors
- Minimalist designs
- Carefully calibrated stone
A wider joint may be suitable for:
- Rustic stone
- Irregular natural stone
- Certain external applications
- Designs where the joint forms part of the visual pattern
The correct width should be based on the stone and installation system.
The objective is to balance aesthetics with technical performance.
Why Extremely Narrow Joints Can Cause Problems
An extremely narrow joint can make alignment more difficult and leave insufficient room for the specified grout system. Joint size should never be reduced below the requirements of the stone and grout manufacturer simply to achieve a seamless appearance.
If the stone pieces vary slightly, the installer may struggle to maintain consistent spacing.
Small differences become more visible across large floor areas.
The installer may also end up with inconsistent joints.
A floor that was intended to look seamless can therefore appear uneven.
The solution is not necessarily to use the smallest possible joint.
It is to choose a joint proportion appropriate to the stone dimensions and design.
Joint Width and Room Size
Joint size can influence the perceived scale of a room. Consistent joints can create visual order, while poorly proportioned or uneven joints can make a floor appear less refined.
Large-format stone with controlled joints can make a space feel visually continuous.
Smaller pieces with more joints create a stronger pattern.
This can be used deliberately.
For example, a large reception area may benefit from large-format stone and restrained joints.
A smaller decorative room may use a smaller format and more visible joint pattern.
The key is consistency.
Uneven joint widths are usually more noticeable than a deliberate wider joint.
The Importance of Joint Consistency
Consistent joint width is essential to a professional-looking stone floor. Even an expensive marble can look poorly installed if joints wander, vary in width or fail to align.
The installer should establish reference lines before laying the stone.
Room geometry should be checked.
The centreline may need to be established depending on the layout.
Cuts should be planned around walls and fixed elements.
The objective is to avoid ending with very narrow slivers at the room edges.
This is a layout issue as much as a grouting issue.
A good installation therefore begins before the first piece is permanently fixed.
Grout and Natural Stone Porosity
Stone porosity affects how easily grout residue can be removed and whether pigments may penetrate the surface. More absorbent stones require careful product selection and installation procedures.
A porous marble or limestone can behave differently from a dense granite.
Before full installation, the stone should be assessed.
If the surface is absorbent, appropriate protection may be recommended by the stone and grout manufacturers.
However, protective products must themselves be compatible with the stone and installation system.
Improperly applied sealers can create their own problems.
This is why a test area is valuable.
It allows the project team to confirm how the stone reacts before committing to the entire floor.
Should Marble Be Sealed Before Grouting?
Whether a marble floor should receive a pre-grouting treatment depends on the stone, grout system and manufacturer’s recommendations. A suitable compatible treatment can sometimes help protect absorbent stone, but it should never be applied automatically.
Pre-grouting protection is not a universal requirement.
Some stones may benefit from an appropriate impregnating treatment.
Others may not require it.
The selected product must also allow the grout to perform correctly.
If the wrong sealer is applied to the joint area, adhesion or grout performance could be affected.
The installer should therefore follow the technical guidance for both the stone and grout.
A sample area remains one of the safest ways to verify compatibility.
Why Grout Haze Ruins the Appearance of Stone
Grout haze is a thin residue left on the surface after grouting, and it can be particularly noticeable on polished marble. If not removed correctly, it can reduce clarity and make a new floor appear dull or dirty.
Grout haze can occur when excess grout is not properly removed during installation.
The problem becomes more difficult when residue is allowed to cure.
The correct cleaning method depends on the grout system and stone.
Acidic cleaners should not be used indiscriminately on natural stone.
Some acids can react with calcium-based stones such as many marbles and limestones, potentially dulling or etching the surface.
This is one of the reasons natural stone requires specialist cleaning knowledge.
Why Acid Cleaners Can Damage Marble
Many marbles contain calcium carbonate, which can react with acids. Acidic cleaning products can therefore etch or dull the surface even when they are effective at removing mineral or grout residues from other materials.
This is an important distinction between natural stone and many ceramic surfaces.
A cleaner that works effectively on a conventional tile may not be appropriate for marble.
The result can be a chemically altered surface rather than a simple stain.
The damage may appear as:
- Dull patches
- Loss of polish
- Cloudy areas
- Surface marks
- Uneven sheen
Cleaning products should therefore be selected specifically for the stone.
When uncertain, consult the stone supplier or a qualified stone-care professional.
How Grout Can Stain Light-Coloured Stone
Light marble can show grout staining more clearly than darker materials, particularly when the stone is absorbent and the grout contains strong pigments. Testing the complete installation system can reduce this risk.
The risk depends on:
- Stone absorption
- Grout formulation
- Pigment
- Surface finish
- Cleaning method
- Exposure time
- Installation technique
This is why a small test panel can be more informative than theoretical assumptions.
The test should use the actual marble and actual grout.
Ideally, it should also reproduce the proposed joint width and installation method.
After curing, the surface should be inspected under appropriate lighting.
The Role of the Installer
Even a high-quality grout can produce poor results if it is mixed, applied, cleaned or cured incorrectly. Installer experience is therefore a major part of successful stone grouting.
The installer should understand:
- The grout manufacturer’s instructions
- Mixing ratios
- Working time
- Joint preparation
- Application technique
- Cleaning procedure
- Curing requirements
- Stone sensitivity
Overwatering a cementitious grout can affect its final properties and colour consistency.
Poor cleaning can leave residue.
Incorrect timing can make the grout difficult to finish.
These are installation issues rather than defects in the stone.
For this reason, the stone contractor should be involved in grout selection rather than receiving an already purchased product with no technical discussion.
Mixing Grout Correctly
Grout should be mixed according to the manufacturer’s specified proportions and procedure. Excess water, inconsistent mixing and repeated uncontrolled adjustments can affect colour, strength and workability.
A common temptation on site is to add water whenever the mixture becomes difficult to work.
This can alter the intended formulation.
The installer should follow the product’s instructions.
Mixing should also be consistent across the project.
If different batches are mixed with different water quantities, the finished grout may show variations in colour.
This becomes especially noticeable on large open-plan floors.
Consistency is therefore essential.
Why Batch Consistency Matters
Using grout from different batches or mixing batches inconsistently can create subtle colour differences across a large floor. For visually important projects, batch consistency should be controlled from the beginning.
This is particularly relevant where:
- The floor is large.
- The grout is strongly coloured.
- Joints are wide.
- The stone is light.
- The grout forms a deliberate design element.
The project team should plan material quantities before installation.
If multiple batches are unavoidable, the installer should follow the manufacturer’s recommendations for maintaining consistent appearance.
Grout for Polished Marble Floors
Polished marble can make grout colour and residue particularly visible because its reflective surface highlights differences in texture and cleanliness.
A polished floor should be inspected under multiple lighting conditions.
Light from windows can highlight residue.
Artificial lighting can emphasise unevenness.
The grout should therefore be cleaned carefully without damaging the polished stone.
Mechanical abrasion should also be controlled.
Aggressive scrubbing with unsuitable materials can scratch or dull polished surfaces.
The objective is to remove grout residue while preserving the factory or fabrication finish of the marble.
Grout for Honed Marble Floors
Honed marble has a less reflective surface than polished marble, but grout selection remains important because the stone can still absorb pigments and residues depending on its characteristics.
Honed surfaces can provide a softer, contemporary appearance.
They may also hide certain minor surface variations more effectively than highly polished finishes.
However, they should not be assumed to be stain-proof.
The same principles apply:
- Test the grout.
- Confirm compatibility.
- Use appropriate cleaning methods.
- Follow manufacturer instructions.
- Avoid unsuitable acids.
The surface finish changes the appearance and behaviour of the stone but does not remove the need for careful installation.
Grout for Granite Floors
Granite generally provides strong durability, but grout should still be selected according to joint width, environment and the specific granite’s characteristics.
Granite varies considerably between varieties.
Some are relatively dense.
Others can have different absorption behaviour.
The surface may be polished, honed, flamed or otherwise finished.
The grout should therefore be specified according to the actual product.
For granite flooring projects, explore our extensive collection of granite and consider the intended application when selecting the stone and finish.
Grout for Large-Format Stone
Large-format stone can create a cleaner visual appearance, but joint alignment and substrate preparation become increasingly important as piece size increases.
Large pieces can highlight unevenness in the substrate.
If the floor is not adequately prepared, the installation may become difficult.
The joint pattern should be established before fixing.
Cuts at room edges should be planned.
The installer should also ensure that the selected grout is appropriate for the specified joint size.
Large-format stone is not simply a matter of using larger pieces.
The entire installation system must accommodate them.
Grouting Bathrooms and Wet Areas
Wet areas require grout and installation materials suited to moisture exposure, while the stone substrate and waterproofing system must also be correctly designed.
Bathrooms have additional considerations.
Water may enter joints.
Cleaning frequency is usually higher.
Shower areas experience repeated moisture exposure.
The grout must therefore be selected according to the application.
However, grout is not the primary waterproofing layer.
A properly designed waterproofing system is essential beneath the finished surface.
The stone and grout work as part of the visible finish.
They should not be expected to compensate for inadequate waterproofing.
Why Grout Colour Is Important in Bathrooms
A grout colour that hides everyday marks can be useful in high-use areas, but the choice should still complement the stone and overall interior design.
Very pale grout can show dirt more readily.
Very dark grout can create strong contrast and may show mineral deposits or changes in appearance over time.
A mid-tone neutral can sometimes provide a practical compromise.
However, the right choice depends on the stone and design.
The final decision should be made using a physical sample wherever possible.
Grout and External Stone Floors
External stone installations require grout and jointing systems suitable for environmental exposure, movement and drainage conditions. Outdoor stone should never be specified using an indoor-only installation approach.
External floors experience:
- Rain
- Temperature changes
- Dirt
- UV exposure
- Movement
- Moisture
- Biological growth
The complete system should therefore be designed for the location.
Joint width may differ from indoor applications.
The substrate and drainage design also matter.
The correct grout or jointing material should be selected according to the specific installation system.
Why Movement Joints Matter
Grout joints are not a substitute for correctly designed movement joints. Large stone floors and building areas may require movement provisions that accommodate substrate or structural movement.
A building can move slightly.
Temperature can change.
Different materials can expand or contract differently.
If movement is not accommodated where required, stresses may be transferred into the finished floor.
The resulting problem may appear as:
- Cracked grout
- Loose stone
- Cracked stone
- Open joints
This is why movement and control joints should be incorporated according to the relevant construction and installation requirements.
They should not simply be filled rigidly because a continuous visual appearance is desired.
Why Grout Can Crack
Grout cracking is often associated with movement, poor substrate conditions, incorrect mixing, unsuitable joint design or inadequate curing rather than the grout colour itself.
Potential causes include:
- Excessive movement
- Poor substrate preparation
- Incorrect mixing
- Excess water
- Inadequate joint depth
- Incompatible materials
- Missing movement joints
- Premature drying
- Installation errors
If grout repeatedly cracks, replacing the surface grout without addressing the underlying cause may only provide a temporary solution.
The installation system should be assessed.
Maintaining Grout Between Stone Floor Tiles
Regular cleaning and appropriate maintenance can keep grout joints looking consistent and reduce the accumulation of dirt. Natural stone and grout should be cleaned using products appropriate to both materials.
Maintenance should begin with the right cleaning method.
Avoid assuming that stronger chemicals are better.
A mild stone-compatible cleaner may be more appropriate than an aggressive general-purpose product.
Routine cleaning should remove:
- Dust
- Soil
- Food residue
- Spills
- Soap residue
The exact maintenance routine depends on the location.
Kitchen floors may require more frequent cleaning than low-traffic bedrooms.
External areas may accumulate more dirt.
How to Avoid Dirty Grout Lines
Dirty grout is often easier to prevent than restore. Appropriate sealing where recommended, prompt spill removal and regular compatible cleaning can help preserve the appearance of joints.
Grout lines naturally collect some dirt because they are recessed relative to the stone.
A textured grout can collect more material than a smooth surface.
Cleaning tools should reach the joint without damaging the stone.
Aggressive scrubbing should be avoided where it can scratch or affect the stone finish.
If a grout sealer is appropriate for the selected product, it should be applied according to the manufacturer’s instructions.
When Grout Should Be Repaired
Small areas of damaged grout can sometimes be repaired, but recurring cracking or widespread failure indicates that the underlying installation should be investigated.
A local repair may be appropriate where:
- A small joint has cracked.
- A section has been damaged.
- A joint has been accidentally removed.
- Local deterioration has occurred.
However, widespread failure may indicate a larger issue.
The project team should investigate:
- Substrate movement
- Moisture
- Joint design
- Product compatibility
- Installation quality
The visible grout may only be the symptom.
How Grout Choice Affects the Value of Natural Stone
Good grout selection allows the stone itself to remain the visual focus, while poor grout can make an expensive natural stone installation appear inconsistent or poorly finished.
This is particularly important in premium residential and commercial spaces.
A homeowner may invest heavily in marble slabs, precise cutting and professional polishing.
If the final joints are uneven, stained or strongly mismatched, the overall effect can be diminished.
The grout is therefore a finishing detail with disproportionate visual importance.
Good design considers it from the beginning.
A Practical Grout Selection Checklist
Before grouting a natural stone floor, confirm the grout, stone, joint width, colour and cleaning method as one coordinated specification.
Use this checklist:
Stone
- What type of natural stone is being installed?
- Is it polished, honed or textured?
- How absorbent is it?
- Has it been tested with the proposed grout?
Grout
- Is it suitable for the intended application?
- Is the joint width within its specified range?
- Is the colour appropriate?
- Are batch quantities sufficient?
Installation
- Is the substrate prepared?
- Are joints consistent?
- Are movement provisions included?
- Is the installer following manufacturer instructions?
Protection
- Does the stone require an appropriate protective treatment?
- Is the treatment compatible with the grout?
- Has a test area been completed?
Cleaning
- What is the recommended initial cleaning method?
- Is the cleaner compatible with the stone?
- How will grout haze be removed?
Maintenance
- Is sealing required?
- Which cleaning products are approved?
- How frequently should the floor be maintained?
This simple checklist can prevent expensive mistakes.
Testing Grout Before Full Installation
A physical test panel is one of the most effective ways to evaluate grout colour, staining, residue and overall appearance before committing to a complete natural stone floor.
The test should use the actual:
- Stone
- Grout
- Joint width
- Finish
- Installation method
Allow the sample to cure as required.
Then inspect it under the project’s expected lighting.
Look for:
- Colour consistency
- Surface staining
- Grout haze
- Joint appearance
- Cleaning difficulty
- Overall visual balance
If the result is unsatisfactory, the specification can be changed before the full floor is installed.
This is much cheaper than correcting an entire completed floor.
Common Grouting Mistakes to Avoid
Many grout-related problems are preventable when the installation team avoids rushed product selection, inconsistent mixing, excessive water, unsuitable cleaning chemicals and poor joint preparation.
Common mistakes include:
Choosing grout only by colour
A colour chart cannot tell you whether a grout is compatible with the stone.
Using the same grout everywhere
Different rooms and applications may require different specifications.
Making joints too narrow
Joint width should follow the stone and grout system requirements.
Ignoring stone porosity
Absorbent marble can require additional precautions.
Cleaning with unsuitable acids
Acidic products can damage many calcium-based stones.
Skipping the test panel
A small test can reveal problems before they become expensive.
Treating grout as waterproofing
Grout does not replace proper waterproofing.
Ignoring movement
Rigid joints cannot compensate for movement in the building or substrate.
Why Professional Stone Advice Matters
Natural stone is a specialist material, and the best grout specification considers the stone, application, installation method and long-term maintenance together.
A stone supplier or specialist can help identify:
- Suitable stone
- Finish
- Installation requirements
- Grout compatibility
- Cleaning requirements
- Maintenance considerations
This is particularly valuable for premium marble and large-format installations.
For more guidance on stone materials and applications, visit Maruti Mining’s Knowledge Base.
Final Guidance on Grout for Stone Floors in Kenya
Grout for stone floors in Kenya should be treated as an important part of the complete natural stone specification. The right colour, joint width, product and installation technique can protect the appearance of marble and help create a cleaner, more durable finished floor.
The most important principle is to avoid choosing grout in isolation.
Start with the stone.
Understand its absorption, finish and intended application.
Then select a compatible grout.
Choose the colour according to the desired architectural effect.
Set the joint width based on the actual stone and grout system.
Prepare the substrate correctly.
Use an experienced installer.
Test the complete system before full installation.
Clean the stone using compatible methods.
And maintain the floor according to the material manufacturer’s recommendations.
For marble, these steps are particularly important.
Marble is valued because every piece has its own natural character. The grout should support that character rather than compete with it.
A successful stone floor is therefore the result of many small decisions working together: stone selection, layout, substrate preparation, joint design, grout specification, installation and maintenance.
When those decisions are coordinated from the beginning, the final result can look significantly more refined and remain easier to maintain over the long term.
For assistance with natural stone selection, fabrication and installation, contact the Maruti Mining team for project consultation.
You May Also Like


Bring Your Vision to Life in Stone
Imagine a space defined by elegance, durability, and timeless beauty. At Maruti Mining Limited, we transform your vision into reality with the finest selection of granite, marble, and quartz, backed by expert fabrication and installation.
Contact our team for a consultation and let’s create a legacy set in stone.
CUSTOM FABRICATION & INSTALLATION ACROSS EAST AFRICA
✔ Premium Collection of Over 80 Stone Varieties
✔ Expert Cutting, Polishing & Installation
✔ Free Project Consultation & Quote
✔ Serving Kenya (Nairobi, Karen, Mombasa), Uganda, Tanzania & beyond.
Request Your Free Consultation:
Maruti Mining Limited
Email: [email protected]
Phone: +254 736 701 174 | +254 728 789 164 | +254 733 519 836
Visit Us: Nairobi, Kenya
Website: https://marutimining.com/
Leave a Reply